![]()
|
|
Photographing Glass
Although there are several different ways to create photographs of glass, there are some basic concepts that are important to get good photos. This is not a comprehensive discussion on cameras and digital photography, so you will need some knowledge about cameras and their settings, to understand this tutorial.
Recommended Equipment:
-A good digital camera, preferably SLR (Single Lens Reflex, usually has interchangeable lenses), with a memory card and battery.
-A good quality lens, 50mm or greater, or a macro lens if you are going to take extreme closeups.
-A sturdy tripod
-A remote shutter release
-A seamless backdrop
-Lights on stands
-Photo editing software
The Camera: any good digital camera will work for this. Taking photos of glass with film cameras was notoriously difficult because it is hard to predict exposures and reflections. Digital makes it much easier. Obviously, the higher the quality of the camera the better the images will be, but any camera around 6 megapixels or greater will be adequate. The camera will need the capability of having a remote shutter release. The shutter release may have to be purchased in addition to the camera. (See image.)

Lens: If you have a SLR camera with interchangeable lenses, you want to choose a lens that is 50mm or greater to avoid barrel distortion. A lens less than 50mm is considered "wide angle", greater than 50mm "telephoto". If you move back from the subject and use a telephoto, it will increase your depth of field, so more of your piece will be in focus.
Tripod: A sturdy tripod is essential because you want long shutter speeds (see below).
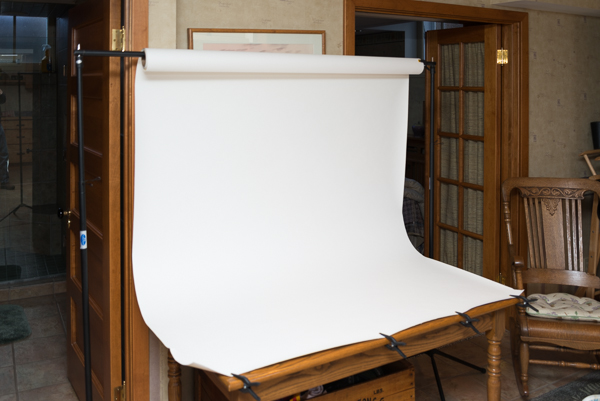
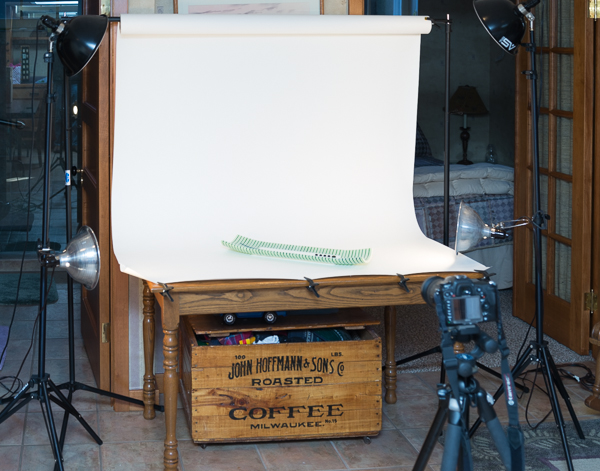
Background: If you want your photos to look professional, you need to have a seamless backdrop. Taking photos of your beautiful artwork on a wrinkled bed sheet never looks good. The best solution is to get a roll of background paper from a photographic supply house(like Adorama or B&H Photo). This comes in several colors, white being the most frequently used, but black or silver can be used also. You will need stands and a crossbar to hold it up, and these are also available from the same suppliers, often with the background paper included. You want to curve the background behind and below the subject so no corner or seam is visible on the image. If your glass objects are small, there are light tents that are essentially 5 sided cubes of a light colored material. You place the object in the tent, and illuminate from outside the tent. This provides a soft, even lighting. In a pinch, you can cut a hole in the bottom of a 5 qt ice cream bucket, invert this over the object, light from outside the bucket, and point the camera through the hole.
Lighting: Although it is possible to use multiple flashes to illuminate your glass, it will take a lot of trial and error to avoid reflections and hotspots. I find it easier to use inexpensive incandescent lights on stands. These can be positioned to optimally show off the glass with minimal reflections. Note, that different light sources shed light of different colors; daylight is blue, incandescent bulbs are yellow, and fluorescent bulbs have a greenish cast. The white balance setting on your camera can adjust for either of these, but it can not adjust for more than one at a time. So, if you are lighting your glass with incandescent bulbs, but have natural light coming in from a nearby window - the camera will have to choose one or the other. This means that part of your photo may have a different color tint than the other. In the setup pictured below, I have light stands with floodlight bulbs on the top, and some clip-on lights from the hardware store in the midportion. I may have all four on, or only two; or two pointed at the ceiling, and two at the glass, etc. Or, I may take one and shine it directly downward onto the glass to show the color transmitted through the glass. It is also possible to get diffusers or reflectors to soften the light.
Camera Settings: One approach is to set the camera on auto, take a shot, and see if you like it. But, a more mindful approach is to follow some simple rules:
Setting up the photos: Obviously you set up the backdrop and place your object on it. Set the lights up in a way that illuminates the subject and avoids reflections. Keep in mind that the best lighting may be obtained by pointing the lights at the ceiling and letting it bounce downward. Put your camera on a tripod, and frame your shot. Make sure the camera is level. Take a shot and evaluate the exposure. Make adjustment as necessary. Try several different angles, lighting combinations, etc. Rotate the piece. Take close-ups as well. Take a lot of images, because you may find that once you get them into your computer they don't look the way they did in the viewfinder or LCD. Frame the photo such that you have some room around the piece; if it is too tight, you may not be able to crop it they way you want. I wouldn't take down your setup until you've checked out the photos on your computer screen. You may find that none of them are good enough.
Post Processing: You will always need to adjust the photos afterwards. There are a myriad of programs for this. I prefer Adobe Lightroom, Adobe Photoshop, or ACDsee. You may need to crop, sharpen, adjust white balance, adjust exposure, adjust contrast, or remove spots. If you took the images as RAW photos, you will need to export them as JPG's. The size that you export them to depends on their future use. For the internet, you want 72 dpi; for print 300 dpi. If a museum is going to have your artwork on a banner in front of the building, you want to send the printer the highest resolution you can get!
All three of these programs will let you organize and adjust photos. but there are distinct cost and ease-of-use differences.
Adobe Photoshop is no longer purchased as an off the shelf product, but instead it is sold by subscription to "Adobe Creative Cloud", so it would be called Photoshop CC.
http://www.adobe.com/products/photoshop/buying-guide.html
Right now, they are selling a Photoshop Creative Cloud "Photography Program" at $9.99/month for the first year, then $19.95/month. This includes Photoshop CC and Bridge. The advantage of this is that as the program is upgraded you get the upgrades at no additional cost. The disadvantage is that as the months go by it gets expensive. If you stop your subscription, you can no longer use the product at all.
Here's an extensive discussion of the pros and cons of this new pricing model
http://www.pixologymag.com/Pixology011-June_2013-EXCERPT.pdf
Adobe Photoshop Lightroom 5. This is a standalone program that you can buy and use. It costs $149 for the full version, and $79 for an upgrade. This program is the best for adjusting large numbers of images, viewing and comparing them. It has the ability to organize and tag photos. It is a powerful program and a phenomenal deal at $149.
http://www.adobe.com/products/photoshop-lightroom/buying-guide.html
ACDsee 17 is a great program for viewing and tagging images. It works well for basic adjustments, but isn't set up to be as streamlined as Lightroom. I often use both simultaneously, I like it's metatagging and viewing process, and I've been using it since it was called ACDsee 2! It is usually $79.99, but can often be found on sale. You can download a free trial and see if you like it. They also have an ACDsee Pro product. I did not find that it had any additional features that I needed - and upgrades were much more expensive, so I've been using the basic ACDsee 17 product.
http://www.acdsee.com/en/products/acdsee-17
If I was to pick one, I would get Lightroom 5, without question. But, if you are on a tight budget, I'd go with ACDsee 17. It would be hard to justify the expense of Photoshop Creative Cloud unless you are planning to do a lot of sophistocated image manipulation beyond basic photo adjusting, cropping, spot removal, and enhancing.
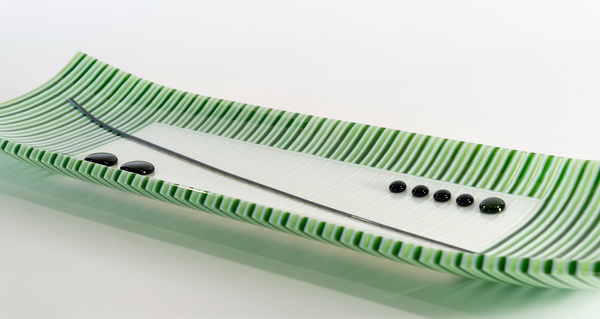
"Zen Garden", 22 1/2" x 6 3/4" x 2"
I hope you found this helpful.
Recommended Video Tutorials:

Keep track of my latest artwork and tutorials, and submit your comments on my Facebook Page:
![]()