![]()
|
|
"Introduction to Pattern Bars"By Steve Immerman First published in Glass Craftsman, issue No. 214, June/July 2009. IntroductionKilnformers are always looking for ways to create new and exciting design elements to incorporate in their pieces. One of the most commonly used design elements is a section of glass with an embedded pattern – created with a pattern bar. This article will discuss ways to make and use pattern bars in kilnformed glass work. |
Making Pattern Bars
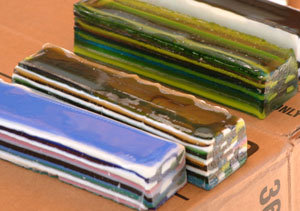
The basic concept in making a pattern bar is to create a “brick” of glass pieces, surround it with fiber paper, and use dams to hold it in position during the firing process. This “brick” is then kiln fired and annealed, and the resulting pattern bar is then cut into slices (like a loaf of bread). The patterned slices are subsequently used in other projects. The color and pattern in the pattern bar slices will obviously reflect the colors and layup of the glass that was used to create it prior to firing. You can create a specific pattern by planning ahead or you can create a random pattern by just placing pieces of glass into the dam enclosure without any pattern in mind. |
Damming the projectThe first step is to have a prepared kiln shelf – either kiln washed, or covered with fiber paper to prevent the glass from sticking to the shelf. You will also have to assemble your dam material. There are many ways to constrain the glass so that it stays in the shape you |
Aft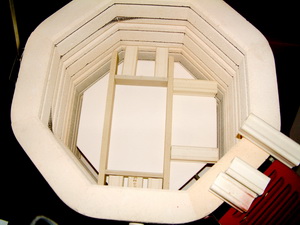 er you construct your dams around your pattern bar construction, make sure that they are well supported so the dams do not move during the fusing process. The mass of glass that you have surrounded with the dams will want to flow when it is molten, and your dams need to be able to withstand the pressure of the hot glass as it pushes against them. The height of the dam will depend on the amount of glass that you’re using in your pattern bar. If you can predict the ultimate height of the bar by counting the specific layers of glass in the assembly try to make the height of your fiber paper about 1/8” shorter. (Editor’s note: For more information on this step, visit the Bullseye Glass website, Bullseyeglass.com, and click on Education, then TipSheet 3, for a detailed explanation on how to dam a large mass of glass.) er you construct your dams around your pattern bar construction, make sure that they are well supported so the dams do not move during the fusing process. The mass of glass that you have surrounded with the dams will want to flow when it is molten, and your dams need to be able to withstand the pressure of the hot glass as it pushes against them. The height of the dam will depend on the amount of glass that you’re using in your pattern bar. If you can predict the ultimate height of the bar by counting the specific layers of glass in the assembly try to make the height of your fiber paper about 1/8” shorter. (Editor’s note: For more information on this step, visit the Bullseye Glass website, Bullseyeglass.com, and click on Education, then TipSheet 3, for a detailed explanation on how to dam a large mass of glass.) |
| Next, you have to decide on the size of the pattern bar, keeping in mind that thicker pieces of glass will require longer annealing times. We often think of pattern bars as square in cross section – but they don’t have to be square. They can be rectangular or even round. If the glass is laid up so that it ends up flat, and only ¾-1/2” thick – something we’d just call a fused panel – it can still be cut up and the internal pattern used the same as one would use a pattern bar (see my article in Glass Craftsman, Issue 212, page 15 of the Batch Insert or link to this page). |
Color and DesignOf course it is necessary to use compatible, fusible glass. Pattern bars can be made of glass which is transparent, opalescent, or a combination. It is important to know how you are going to use the pattern bar slices after you create them to determine which kind or mixture of glasses you are going to need. If you want to create a specific pattern it is best to do some planning. The pattern can be nothing more than layers of alternating color – or a complex geometric design. The glass can be placed horizontally, vertically, or a combination of both. Frit and stringers can be incorporated into the design as well. Keep in mind that if you want all the slices of the bar to be identical all strips of glass have to extend from one end of the bar to the other. For geometric designs it is best to do a detailed drawing first. One easy way to draw out your design is to use graph paper. If you are using glass that is 1/8” thick – assign each square to be 1/8”. Draw the outside perimeter of the proposed shape of your bar, and then fill in your design. Once this is done, cut strips of glass the length of your pattern bar, and begin assembling. The best way to assemble the pattern bar is directly on the kiln shelf so that you don’t have to move the assembled bar. But, if this is not possible, hold the strips together with Krazy Glue or a similar product so you can move it to the kiln without it coming apart. A random pattern bar can be created by placing strips of glass in an enclosure without any predetermined pattern in mind. Often some very interesting patterns can be obtained with this technique. Keep in mind that with this technique it can be hard to predict the height of your bar after firing. I’d recommend erring on the side of making your dams too high, rather than too low. |
Firing ScheduleObviously the schedule will depend completely on the size and thickness of the pattern bar, the brand of glass, and the firing characteristics of your particular kiln. But, a typical Pattern bar firing schedule, for approx 1 1/4" thick bars made of Bullseye glass would be: 500 dph to 1500 F Hold 35 min. AFAP to 900 F, hold 4 hours. 100 dph to 800, no hold 200 dph to 700 F, hold 2 hours. 300 dph to 300 F Off Keep in mind that it is perfectly fine to fire multiple bars at once. This will actually save you time and electrical energy and ultimately give you a nice selection of designs to work with |
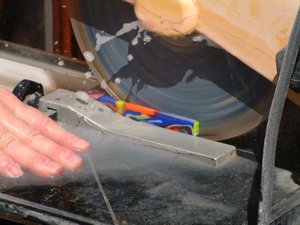
Cutting the Pattern BarsSlicing up this mass of glass will require a saw of some kind. I use a tile saw with a lapidary blade, but there ar When cutting the pattern bar, make sure your saw is providing an adequate water spray. Have some sort of guide to ensure each slice is of uniform thickness. Go slowly as you saw through the pattern bar and don’t apply too much pressure – especially at the very end of the cut. You’ll probably get some small chips at the corners of the pattern bar. These can be frustrating, but usually will not render the slice unusable. After cutting it is wise to drop the slice in a bucket of water containing some liquid detergent so that the particulate matter in the tile saw water doesn’t have a chance to dry on the glass until you can clean the slice. |
Preparing the Slices for FusingIn spite of your best efforts, the cross section of the bar may not be perfectly square or rectangular. A wet belt sander or lapidary wheel is helpful at this stage to grind the edges flat and to smooth out any chips at the corners of the slices. I like to sandblast all surfaces of the slice prior to incorporating it into another project. If you don’t have access to a sandblaster, the slices should be removed from the bucket of water, scrubbed with a toothbrush and rinsed thoroughly before allowing them to dry. This will minimize any haze or devitrification that can appear after the second firing. The pattern bar slice can be used in numerous ways. They can be placed on top of two layers of sheet glass and allowed to melt into the underlying sheet. This will allow the pattern bar to expand and round out. Alternatively, the pattern bar slice can be surrounded by layers of glass, which will allow it to maintain its shape and appearance. Another common way to use pattern bars it to place many of them in an array, one against the other to create a pleasing, repeating pattern. Placing pattern bars in “bookend” fashion can also give some interesting effects. Shuffling these slices around until you get a pleasing pattern is both en |
ConclusionPattern bars are a fascinating way to add complex designs to kilnformed work. There are some artists who use this exclusively as the major focal point in their work. I hope this article has provided you with enough information to give it a try! |
More info can be found in Bullseye's video tutorials:
|
 In order to create a pattern bar you will need a kiln, dams, fiber paper, and fusible glass. In order to use the pattern bar you will need a tile saw with a lapidary blade. It is helpful, but not necessary, to have a sandblaster and grinding tools.
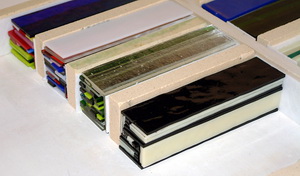 want and doesn’t flow over the kiln shelf during the firing process. Whichever way you choose, you will need to have fiber paper between your damming material and the glass. A common way to hold the glass in place is to use cut up strips of kiln shelves placed to surround the glass on four sides. If a cut up shelf is not available, one can purchase blocks of refractory material from fusing supply outlets. There are also stainless steel molds that can be purchased specifically for this purpose. In the absence of any of these products, the glass can be wrapped with several layers of fiber paper, and then wrapped with stainless steel or nichrome wire to hold things in place during fusing. To create pattern bars that are circular in cross section, fiber lined pipe nipples can be used as described in an article by Judith Conway and Kevin O’Toole in Glass Craftsman issue 181, Dec/Jan 04, page 27.
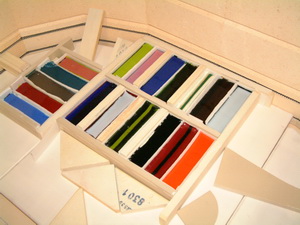
 e other types of water cooled saws that will also work such as a band saw or ring saw – but they may not be as efficient. The main decision to be made before cutting is what thickness you want the slices to be. It helps to know what you are going to create with these slices, how many layers your project will be, whether you plan to fuse the pattern bar slice on a sheet of glass, and whether you plan to cover it with a layer of clear glass. It is very frustrating to find out your slices are too thick or too thin for your intended use.
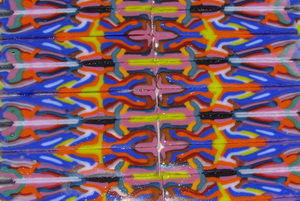 joyable and therapeutic! Once an acceptable pattern is obtained, it can be dammed and fused alone, fused on a sheet of glass as a base, or a border can be added for contrast.